


 Big Buds
- Mensagens : 1650
Data de inscrição : 22/11/2011
tipo de cultura : Terra, Hidro,
20102022
Super Skunk Automatic is built upon classic genetics and enhanced with the automatic flowering trait. For many years, indoor and outdoor growers have enjoyed the high yields, heavy trichome coverage, and classic flavour and terpene profiles. Grown all over the world, Super Skunk Automatic is ideal for everyone to grow, regardless of cultivation experience.
Flowering stage: 77 days
Total time, seed to harvest: 98 days
Final yield: 147 grams
THC content: 16.4%
Super Skunk Automatic (also available in regular and feminized seeds) is an 80% indica-dominant plant with a parental lineage of epic pedigree. To create this enjoyable strain, an Afghan was outcrossed to Skunk #1 and the resulting offspring crossed to a ruderalis. The ease with which this plant grows makes it popular amongst new growers, and the quality of the flower is what makes it popular with everyone.
The automatic version of Super Skunk was designed to help outdoor growers harvest more than once yearly because this plant does not require a change in light hours to flower. This feature also benefits indoor growers who don’t have a completely lightproof area. If your flowering area is full, these can be run seed to harvest in the veg area next to your photoperiod plants.
We used a basic setup to emulate what most gardeners are working with. We used BAC Lava Mix for our soil, Bio Grow and Bio Flower nutrients, and a 1000W Green Power Phillips HPS lighting system. Results will vary, but gardeners of all levels can succeed by following a few basic steps.
Our grow was conducted in a large cell, and the light was fixed 300 cm above the soil level. Circulating fans were used to prevent stagnant air within the growing area. Additionally, we added an inline fan connected to a carbon scrubber to reduce aromas and exhaust the air from the cultivation area.
Germination & seedling
We started our Super Skunk Automatic seeds by putting them between two damp paper towels, and within 48 hours, they had opened, and the small white tap root was protruding from the shell. We gently removed the opened seeds from the water using tweezers and placed each seed into the soil with the tap root pointed down. Within 36 hours, our seeds had broken the surface of the soil.
It is crucial to check the environmental controls before commencing, and it is now time to review our lighting schedule, temperature and humidity levels. We ran our lights 18 hours on and 6 hours off for the entire grow cycle. Temperatures with the lights on were maintained at 23°C and 21°C with the lights out.
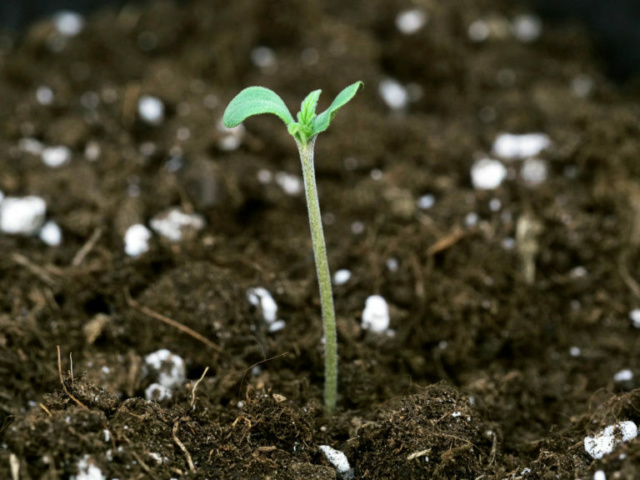
The humidity was changed at various stages throughout our growing cycle. For this early growth stage, we kept a slightly elevated level of 65% humidity. The young Super Skunk root system did not require much water; we kept the amounts small, spaced apart, and delivered directly at the base of the stem.
To get a jumpstart against any potential pest problems, we released the beneficial insect, Hypoaspis Miles. This predator will feed on any fungus gnat or thrip larvae lurking in the soil and garden area.
Vegetation

Week two, and our plant was growing noticeably, and the roots were visible from the bottom of our 1-litre container by midweek. Immediately we transplanted our Super Skunk into a 3-litre container to encourage the root zone to continue developing. When watering, we used 100 ml of pure water pH’d to 6.2 and poured it directly onto the base of the stem.
To help strengthen the plant, we turned the pot each day. Our Super Skunk reacted by bending towards the new position of the light, which increased the thickness and strength of the main stem. Additionally, we had a light breeze circulating the grow area, which was visible by the movement of the young leaves.

We deployed more beneficial insects in week three. This time, we released Amblyseius Cucumeris and Amblyseius Californicus to mitigate any potential dangers from thrip larvae and two-spotted spider mites.
The growth of our Super Skunk Automatic was remarkable. Already the lower nodes had developed into branches that were reaching up to capture the light, and the overall colour of the leaves indicated all our established parameters, from temperature to feeding, were on point.
One new addition to the routine was the introduction of grow nutrients. The combined solution we added to the soil held an EC of 1.6, and the 100 ml of water remained unchanged.
Flowering

By week four, our Super Skunk was developing substantially, doubling in height from the week prior. Our plant now stood 28 cm above the soil, with over seven nodes. We saw roots at the base of our container and transplanted our Super Skunk into the final container, a 5-litre pot. To accommodate the more extensive root system and more soil, we increased our watering solution to 150 ml.
Because this is the Super Skunk Automatic, we did not need to change the lighting schedule for flowering to begin. This plant was starting to show the initial signs of flowering by displaying a tiny stigma next to each of the upper nodes. This visual indicator also shows us that this is a female plant.

Week five showed more explosive growth from our Super Skunk, growing from 28 cm prior to 43 cm this week and it’s obvious the grow nutrients were working well.
On the first day of the week, we flushed the soil using 500 ml of plain water to avoid nutrient build-up in the soil. and resumed giving the plant proper nutrition by switching from growing to bloom nutrients. The EC of our solution was adjusted slightly to 1.7, and the overall volume we fed the plant increased gradually to 500 ml by the end of this week.
Another change this week was the humidity levels. As our Super Skunk began to form buds, we dropped the RH from 65% to 60% to discourage the potential of mould spore growth. The nodal spacing of our Super Skunk resulted in an open structure that allowed each of the branches to receive maximum light and airflow. Newly forming flowers began to resemble little poof balls on the tips of each branch.


In week six, we made a slight tweak to our watering solution by increasing our bloom nutrients, which resulted in a final EC of 1.8. We began the week using a volume of 500 ml per plant, but gradually increased the amount throughout the week to finish at 600 ml.
In an effort to stay ahead of pest problems, we released another batch of Hypoaspis Miles, which is used organically to control fungus gnat and thrip pupae populations. By the end of the week, flowers began forming into large colas.

Week, seven was uneventful regarding adjustments in the routine. Our light schedule was still 18 on and 6 off; day temperatures held steady at 23°C, with night temperatures kept at 21°C. The humidity in the room was balanced at 60%, and the feeding solution remained at 6.2 pH with an EC of 1.8.

Bud development was the main priority of the plant in week eight. Already, the weight of the buds was making the branches hang slightly lower. We didn’t do any special training techniques, and we began to wonder if the branches would support all of the biomass. Our plant had only grown 5 cm since last week and indicated the shift from vertical stretch to dedicated bud production.
We flushed our soil using 500 ml of pure water on the first day of this week. For the remainder of the week, bloom nutrients were added to our watering solution, and one more round of Hypoaspis Miles sachets were hung from the branches to counteract any thrips or fungus gnat pupae.


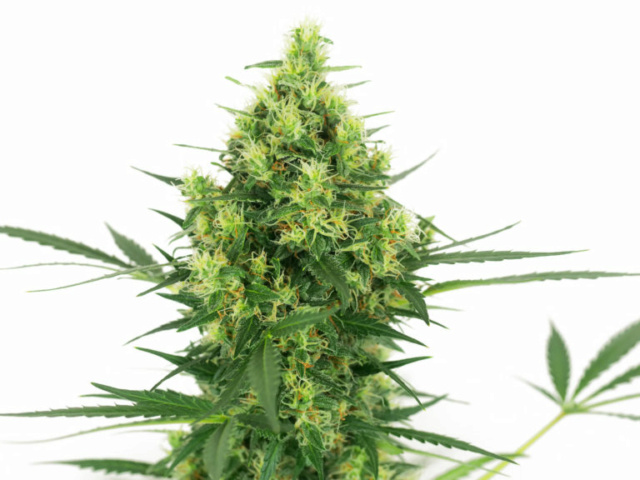
In week nine, we noticed some stigmas turning brown and retreating into the bracts. Bud production continually increased, as did the coverage of trichomes on the sugar leaves and flowers. We also began noticing a pleasant odour from our plant, which prompted us to connect our carbon extractor to the exhaust fans.
This week’s environmental change was to drop the humidity slightly from 60% down to 58%. As the buds of our Super Skunk swell and grow in size, we were paying close attention to the humidity levels in the garden.

As we were getting closer to harvest in week ten, we wanted to ensure that we didn’t have nutrient buildup in the soil, so again, we began the week by flushing with 500 ml of pure water. We then resumed our regular feeding schedule for the remainder of the week.
The buds of our Super Skunk were starting to get big, bulky, and dense, so we decided to drop the humidity levels in the grow area to 52%.


In week eleven, we saw the flowers start to form the most interesting elongations away from the main bud site. These elongations were like cat whiskers, in a rare “string of pearls” growth pattern.
The leaves of our Super Skunk were an even colour from top to bottom. There weren’t any indications of overfeeding in the form of burnt tips, nor was there any indicator of underfeeding represented by the leaf colour. The colour of the plant looked great.


In week twelve, we repeated the “first day of the week” flushing of our medium, using 500 ml of pure water. Our Super Skunk still had a few weeks to go, so we weren’t ready to stop supplementing feeding nutrients and gave our plant 600 ml of solution until the week’s end. The unique bud structure progressed, and our Super Skunk was turning into a beautiful and unique plant in our garden.
By week thirteen, we began to see some natural fading in the colour of the leaves. We had not yet begun our full flushing procedure, but in many cases, this is a natural act of a plant that is approaching peak ripeness. We increased the volume of the watering solution this week to 700 ml in one last push before the end.
The branches were full of dense bud formations, and there was little spacing between the nodes. We were hoping for a rewarding harvest, and all signs were leaning that way. Based on the buds’ trichome head colour, there are still a few weeks left before harvest.
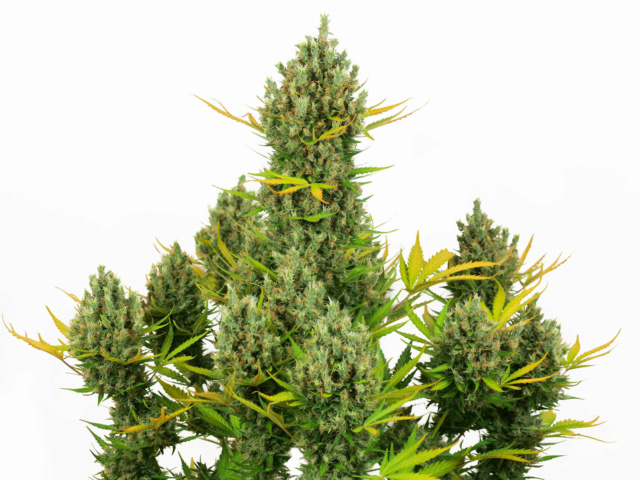

We were closer to harvest by week fourteen, and we decided that starting the final flush would be best. We accomplished this by adding 500 ml of pure water each day to the base of our plants. By the end of the week, many of the leaves on our Super Skunk had senesced and were removed by hand. Many of the remaining leaves showed clear signs of fading too.

Week fifteen would be the final week before harvest, and we continued to flush our medium daily. We repeated the same process from the week before. When inspecting the trichomes for peak ripeness, look at the trichomes from the middle portions of the upper buds.
The unique bud structure presented plenty of options to inspect the trichomes. However, we avoided the tips of the foxtails, because these would have newly developing trichomes. We wanted our Super Skunk to have approximately 10% clear trichome heads, 10% amber heads, and 80% milky heads, which we found upon our inspection. It was harvest time!
https://sensiseeds.com/en/blog/super-skunk-automatic-grow-report-indoor/
Flowering stage: 77 days
Total time, seed to harvest: 98 days
Final yield: 147 grams
THC content: 16.4%
Super Skunk Automatic (also available in regular and feminized seeds) is an 80% indica-dominant plant with a parental lineage of epic pedigree. To create this enjoyable strain, an Afghan was outcrossed to Skunk #1 and the resulting offspring crossed to a ruderalis. The ease with which this plant grows makes it popular amongst new growers, and the quality of the flower is what makes it popular with everyone.
The automatic version of Super Skunk was designed to help outdoor growers harvest more than once yearly because this plant does not require a change in light hours to flower. This feature also benefits indoor growers who don’t have a completely lightproof area. If your flowering area is full, these can be run seed to harvest in the veg area next to your photoperiod plants.
We used a basic setup to emulate what most gardeners are working with. We used BAC Lava Mix for our soil, Bio Grow and Bio Flower nutrients, and a 1000W Green Power Phillips HPS lighting system. Results will vary, but gardeners of all levels can succeed by following a few basic steps.
Our grow was conducted in a large cell, and the light was fixed 300 cm above the soil level. Circulating fans were used to prevent stagnant air within the growing area. Additionally, we added an inline fan connected to a carbon scrubber to reduce aromas and exhaust the air from the cultivation area.
Germination & seedling
We started our Super Skunk Automatic seeds by putting them between two damp paper towels, and within 48 hours, they had opened, and the small white tap root was protruding from the shell. We gently removed the opened seeds from the water using tweezers and placed each seed into the soil with the tap root pointed down. Within 36 hours, our seeds had broken the surface of the soil.
It is crucial to check the environmental controls before commencing, and it is now time to review our lighting schedule, temperature and humidity levels. We ran our lights 18 hours on and 6 hours off for the entire grow cycle. Temperatures with the lights on were maintained at 23°C and 21°C with the lights out.

The humidity was changed at various stages throughout our growing cycle. For this early growth stage, we kept a slightly elevated level of 65% humidity. The young Super Skunk root system did not require much water; we kept the amounts small, spaced apart, and delivered directly at the base of the stem.
To get a jumpstart against any potential pest problems, we released the beneficial insect, Hypoaspis Miles. This predator will feed on any fungus gnat or thrip larvae lurking in the soil and garden area.
Vegetation

Week two, and our plant was growing noticeably, and the roots were visible from the bottom of our 1-litre container by midweek. Immediately we transplanted our Super Skunk into a 3-litre container to encourage the root zone to continue developing. When watering, we used 100 ml of pure water pH’d to 6.2 and poured it directly onto the base of the stem.
To help strengthen the plant, we turned the pot each day. Our Super Skunk reacted by bending towards the new position of the light, which increased the thickness and strength of the main stem. Additionally, we had a light breeze circulating the grow area, which was visible by the movement of the young leaves.

We deployed more beneficial insects in week three. This time, we released Amblyseius Cucumeris and Amblyseius Californicus to mitigate any potential dangers from thrip larvae and two-spotted spider mites.
The growth of our Super Skunk Automatic was remarkable. Already the lower nodes had developed into branches that were reaching up to capture the light, and the overall colour of the leaves indicated all our established parameters, from temperature to feeding, were on point.
One new addition to the routine was the introduction of grow nutrients. The combined solution we added to the soil held an EC of 1.6, and the 100 ml of water remained unchanged.
Flowering

By week four, our Super Skunk was developing substantially, doubling in height from the week prior. Our plant now stood 28 cm above the soil, with over seven nodes. We saw roots at the base of our container and transplanted our Super Skunk into the final container, a 5-litre pot. To accommodate the more extensive root system and more soil, we increased our watering solution to 150 ml.
Because this is the Super Skunk Automatic, we did not need to change the lighting schedule for flowering to begin. This plant was starting to show the initial signs of flowering by displaying a tiny stigma next to each of the upper nodes. This visual indicator also shows us that this is a female plant.

Week five showed more explosive growth from our Super Skunk, growing from 28 cm prior to 43 cm this week and it’s obvious the grow nutrients were working well.
On the first day of the week, we flushed the soil using 500 ml of plain water to avoid nutrient build-up in the soil. and resumed giving the plant proper nutrition by switching from growing to bloom nutrients. The EC of our solution was adjusted slightly to 1.7, and the overall volume we fed the plant increased gradually to 500 ml by the end of this week.
Another change this week was the humidity levels. As our Super Skunk began to form buds, we dropped the RH from 65% to 60% to discourage the potential of mould spore growth. The nodal spacing of our Super Skunk resulted in an open structure that allowed each of the branches to receive maximum light and airflow. Newly forming flowers began to resemble little poof balls on the tips of each branch.


In week six, we made a slight tweak to our watering solution by increasing our bloom nutrients, which resulted in a final EC of 1.8. We began the week using a volume of 500 ml per plant, but gradually increased the amount throughout the week to finish at 600 ml.
In an effort to stay ahead of pest problems, we released another batch of Hypoaspis Miles, which is used organically to control fungus gnat and thrip pupae populations. By the end of the week, flowers began forming into large colas.

Week, seven was uneventful regarding adjustments in the routine. Our light schedule was still 18 on and 6 off; day temperatures held steady at 23°C, with night temperatures kept at 21°C. The humidity in the room was balanced at 60%, and the feeding solution remained at 6.2 pH with an EC of 1.8.

Bud development was the main priority of the plant in week eight. Already, the weight of the buds was making the branches hang slightly lower. We didn’t do any special training techniques, and we began to wonder if the branches would support all of the biomass. Our plant had only grown 5 cm since last week and indicated the shift from vertical stretch to dedicated bud production.
We flushed our soil using 500 ml of pure water on the first day of this week. For the remainder of the week, bloom nutrients were added to our watering solution, and one more round of Hypoaspis Miles sachets were hung from the branches to counteract any thrips or fungus gnat pupae.


In week nine, we noticed some stigmas turning brown and retreating into the bracts. Bud production continually increased, as did the coverage of trichomes on the sugar leaves and flowers. We also began noticing a pleasant odour from our plant, which prompted us to connect our carbon extractor to the exhaust fans.
This week’s environmental change was to drop the humidity slightly from 60% down to 58%. As the buds of our Super Skunk swell and grow in size, we were paying close attention to the humidity levels in the garden.


As we were getting closer to harvest in week ten, we wanted to ensure that we didn’t have nutrient buildup in the soil, so again, we began the week by flushing with 500 ml of pure water. We then resumed our regular feeding schedule for the remainder of the week.
The buds of our Super Skunk were starting to get big, bulky, and dense, so we decided to drop the humidity levels in the grow area to 52%.


In week eleven, we saw the flowers start to form the most interesting elongations away from the main bud site. These elongations were like cat whiskers, in a rare “string of pearls” growth pattern.
The leaves of our Super Skunk were an even colour from top to bottom. There weren’t any indications of overfeeding in the form of burnt tips, nor was there any indicator of underfeeding represented by the leaf colour. The colour of the plant looked great.


In week twelve, we repeated the “first day of the week” flushing of our medium, using 500 ml of pure water. Our Super Skunk still had a few weeks to go, so we weren’t ready to stop supplementing feeding nutrients and gave our plant 600 ml of solution until the week’s end. The unique bud structure progressed, and our Super Skunk was turning into a beautiful and unique plant in our garden.
By week thirteen, we began to see some natural fading in the colour of the leaves. We had not yet begun our full flushing procedure, but in many cases, this is a natural act of a plant that is approaching peak ripeness. We increased the volume of the watering solution this week to 700 ml in one last push before the end.
The branches were full of dense bud formations, and there was little spacing between the nodes. We were hoping for a rewarding harvest, and all signs were leaning that way. Based on the buds’ trichome head colour, there are still a few weeks left before harvest.


We were closer to harvest by week fourteen, and we decided that starting the final flush would be best. We accomplished this by adding 500 ml of pure water each day to the base of our plants. By the end of the week, many of the leaves on our Super Skunk had senesced and were removed by hand. Many of the remaining leaves showed clear signs of fading too.

Week fifteen would be the final week before harvest, and we continued to flush our medium daily. We repeated the same process from the week before. When inspecting the trichomes for peak ripeness, look at the trichomes from the middle portions of the upper buds.
The unique bud structure presented plenty of options to inspect the trichomes. However, we avoided the tips of the foxtails, because these would have newly developing trichomes. We wanted our Super Skunk to have approximately 10% clear trichome heads, 10% amber heads, and 80% milky heads, which we found upon our inspection. It was harvest time!
https://sensiseeds.com/en/blog/super-skunk-automatic-grow-report-indoor/
yammi e Tchics gostam desta mensagem
Compartilhar este artigo em:
Comentários
Nenhum comentário
Permissões neste sub-fórum
Não podes responder a tópicos